What and why
Today I'm going to be writing about how to set up a continuous integration and respectively a continuous deployment pipeline with Azure DevOps for a custom solution containing a SharePoint Framework react-based webpart client app and an ASP.NET Core Web API backend.
Context
The inspiration for creating this article actually came from a real-world scenario. It was a project, that I worked on almost from the beginning, for a client of Accesa. We ended up creating a custom solution distributed among multiple platforms such as: SharePoint Online as the hosting for the entry point of the application, which is a SharePoint Framework (SPFx for short from now on) webpart, built using React, in a single page application style; Azure Active Directory (AAD) for the authentication and authorization of the users; as a backend service for the client app we built an ASP.NET Core Web API application hosted on Azure, nicely integrated with Application Insights for tracking and monitoring of course, and having its data backed by an Azure SQL database.
The reasoning behind the choice of this high level architecture is beyond the scope of this article, but what I'm getting at is that this is a relatively simple scenario with quite some potential of being replicated in other projects as well.
Having this chance of prevalence, it gave me the idea to share the lessons learned from building this successfully delivered project from a devops perspective. Even though in theory this setup shouldn't pose any major risks in terms of automating the builds and releases, the actual experience was a bit different, mostly due to the time pressure and the fact that I haven't worked with SPFx before. Moreover, back then, there weren't any official guides on how to achieve this automation, only solutions thought by different developers.
Alas, knowing what were the headaches I had to deal with, I bravely went on ahead with this quest of helping my fellow peers and you my curious and eager readers, so that everything that lies in front of this journey is known, so that you don't bang your head on the same walls that I did, so that you could reach the automation Nirvana. Or, at least that was my plan, until...
(No, I didn't get ambushed by a high level blood thirsty dragon)
Until I stumbled upon new official documentation pages on SPFx explaining quite nicely how to implement CI/CD using Azure DevOps! Did this stop me in my tracks? Oh hell no! It made the whole situation even better: firstly I can go update the project's pipelines to something more simple and straightforward (you'll see why), and secondly because now I can contrast and compare the two versions.
Content
Enough with the chatter, on with the show! In the following paragraphs I'm going to talk a bit about the demo solution prepared for this article, and then continue to the main focus of this post which is how to do the automation part. And at the end I'll write down what I've learned from all of this. All right, let's begin!
Solution
You can find the demo source code in this repo: https://github.com/ecraciun/SPFxWebApi. There are 3 main pieces to the puzzle: the client app, the backend service and the infrastructure as code, all of which will be succinctly described below.
The API
This is a simple and straightforward ASP.NET Core Web API, with no magic at all. It exposes one endpoint /api/people and it uses Bogus nuget package to generate random data. There's no authentication, and the CORS settings allows any header, origin and method to call in. Absolutely bare minimal, just to prove a point.
Prerequisites
- Visual Studio 2017 or later (I used 2019 preview)
- .NET Core SDK 2.2
The client app
This is the SPFx webpart that will be deployed later in a SharePoint app catalog and loaded into a page. I've used yeoman to generate a new project using the @microsoft/sharepoint template generator. Actually I followed more or less these steps described here with the only difference being that I chose React as the framework.
Unfortunately, there's no magic here either, but it did took a bit more coding to get the demo MVP up in shape. Basically I have PeopleList component, that displays the data retrieved on demand from the PeopleService, which in turn calls the API.
The only remark is that the URL to the API is saved in /Client/src/common/config.ts and I know this doesn't really seem like a pretty solution but it works. I had some difficulties finding a proper way to have configuration files available for a client app, and the trials didn't go as planned, in the meantime consuming precious time, so for the moment, this satisfies our needs. I've also created a gulp task named update-config-properties in the gulpfile.js that is called in one of the build pipeline tasks to update the value for whatever environment is being targeted. I know that this way I'm basically re-writing the whole file, committing to the fact that I have to keep in sync both the gulp task and the config file (but it's fine for a few config values) and also that I will have to queue up a new build for any new environment I'm deploying to since this fill will get embedded in the solution package.
Actually I stumbled upon something that seemed exactly what I needed https://github.com/SharePoint/sp-dev-fx-webparts/tree/master/samples/react-app-settings, but unfortunately I didn't manage to get it working in my demo project or in the sample itself.
If you didn't figure it out until now, client side development isn't my strong point. I simply don't have that much experience with it yet. My head is mostly in the clouds :). So if anyone has a relevant and working suggestion to solve this configuration problem I would greatly appreciate it. Just drop a comment at the end of this article please.
Prerequisites
- Node.js 8.x (this is quite important, since SPFx projects won't work with any other Node version, which is quite peachy if you have other projects ongoing that would love a newer version)
- Basically any text editor (I used Visual Studio Code)
- The gulp npm package installed globally on your machine (command for your favorite terminal: npm i -g gulp)
The automation templates
Your everyday ARM templates. I've created an AppService Plan and a WebApp as resources, the latter depending on the former obviously, and extracted parameters for the plan name, plan SKU and app name. And that's all there is regarding the infrastructure as code needed for hosting the API.
Creating the pipelines
Ok, now that's out of the way, let's get to the guts of the matter at hand.
First, we need an automated build
Going to the Pipelines menu, and then to the Builds submenu, I've created a new Build Pipeline starting from an empty template. Since I like order and discipline, I've made sure I've added two more agent jobs besides the first default one, just to have things clear and separate.
In the following paragraphs I'll go through each one.
ARM templates Agent job
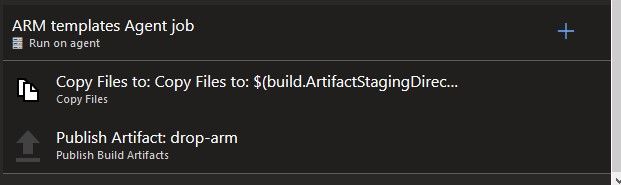
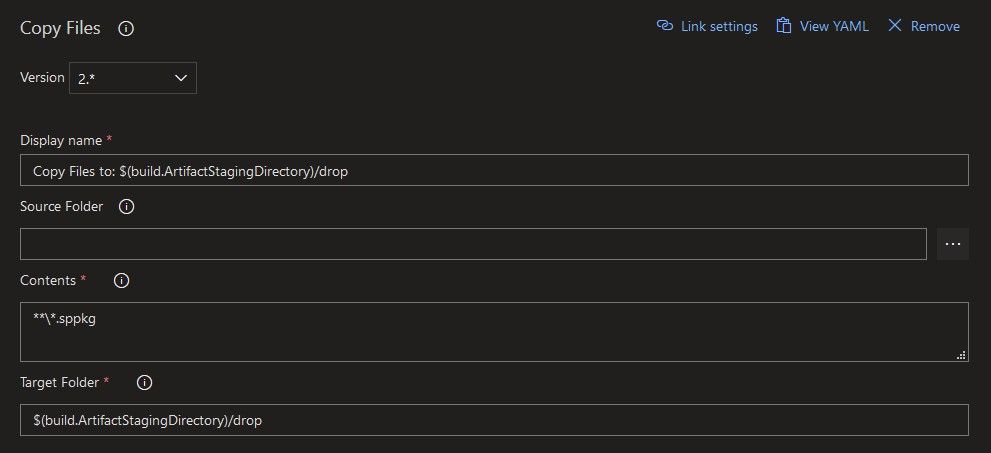
This is quite a short and easy step. All I wanted to do here is to make sure the template.json and template.parameters.json are published as artifacts, to be used in the release pipeline.
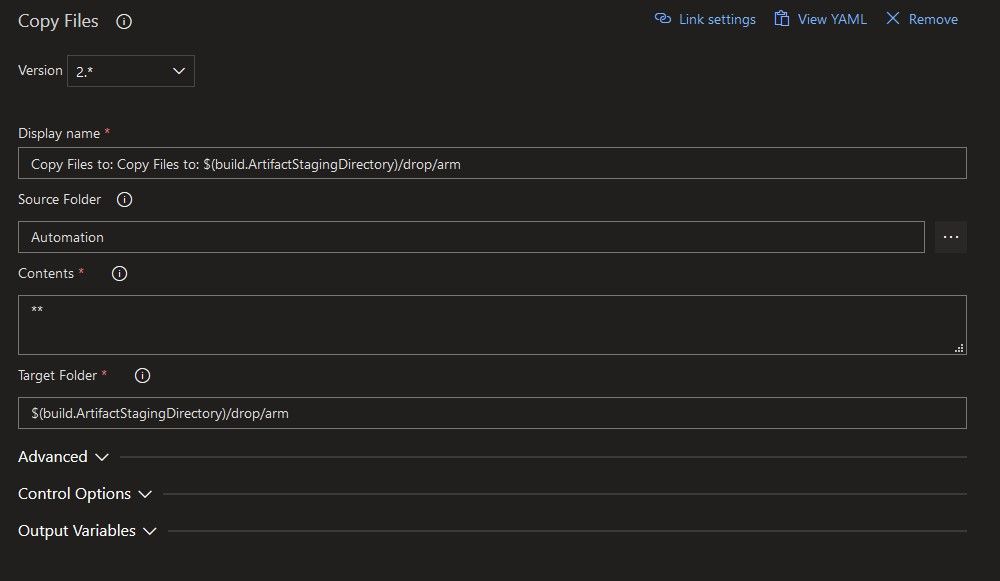
So the copy task looks like this:
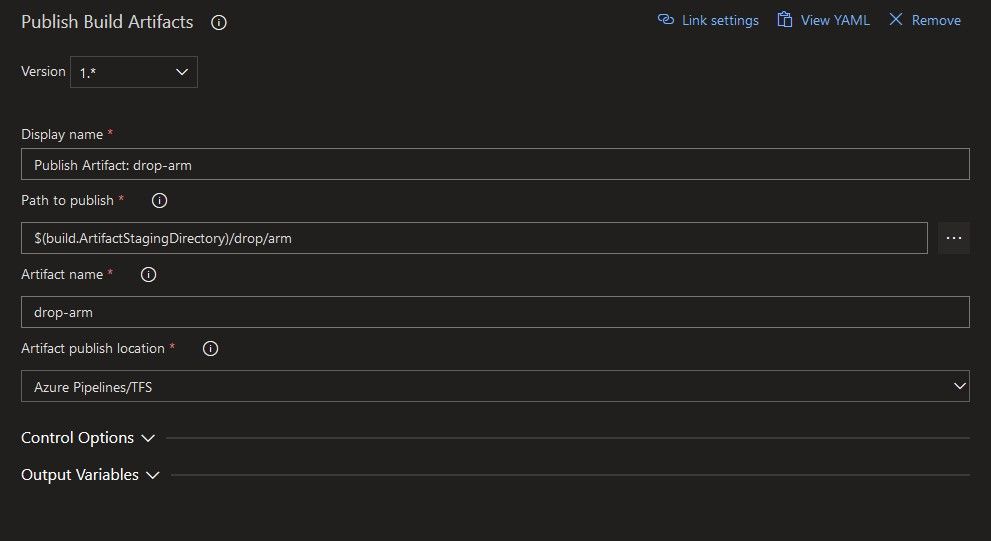
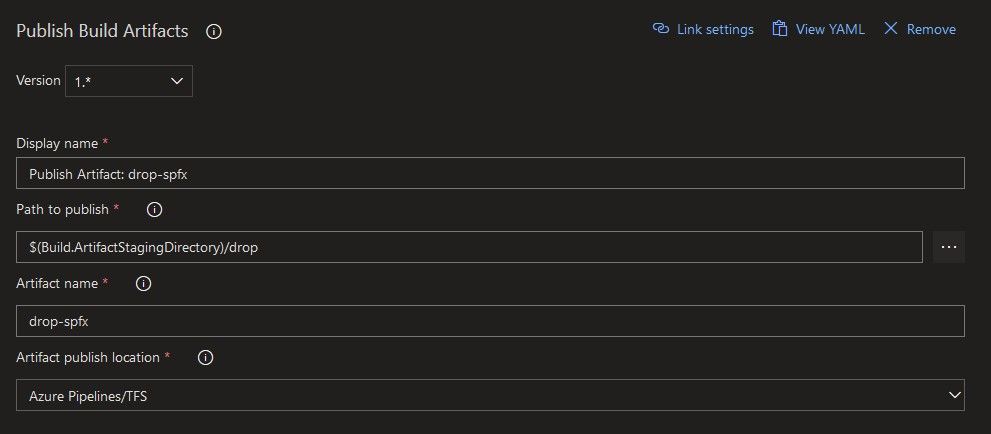
And the publish artifacts one like this:
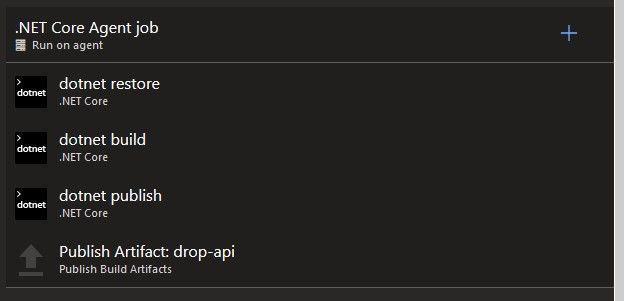
.NET Core Agent job
Here, there is nothing more than the classical restore-build-publish pattern. As a note, I have not implemented any tests in this demo solution just to keep things easy. For an actual project things would be different.
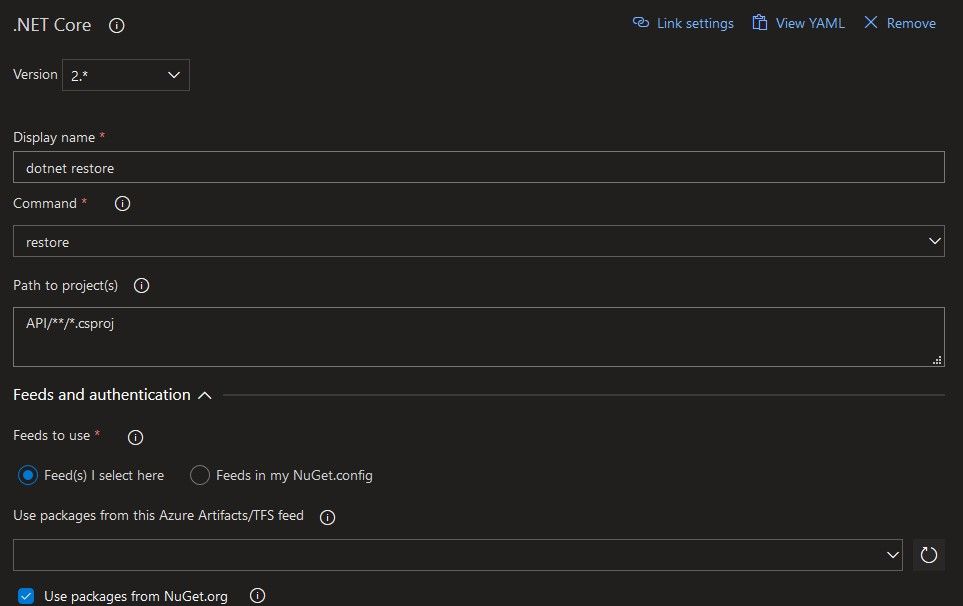
The only thing I did custom in the restore task was to point it to the correct path of the .csproj file.
For the build task, I've added an extra command line argument --configuration $(BuildConfiguration) to specify the desired build configuration, Release in my case. The $(BuildConfiguration) is a reference to a variable set up in the pipeline. But more on this a bit later.

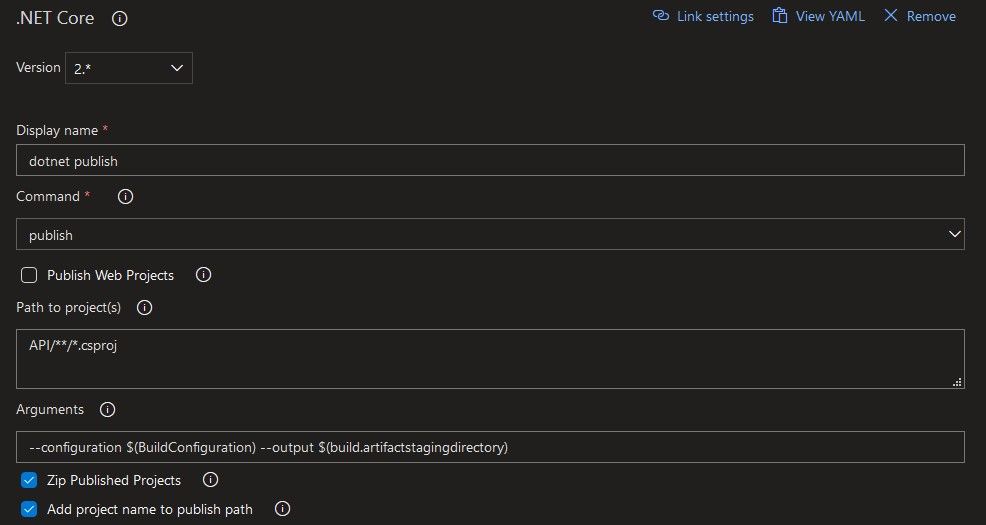
Next up the publish task has two arguments: --configuration $(BuildConfiguration) --output $(build.artifactstagingdirectory). The result of the publish will be saved in the special ArtifactsStagingDirectory folder.
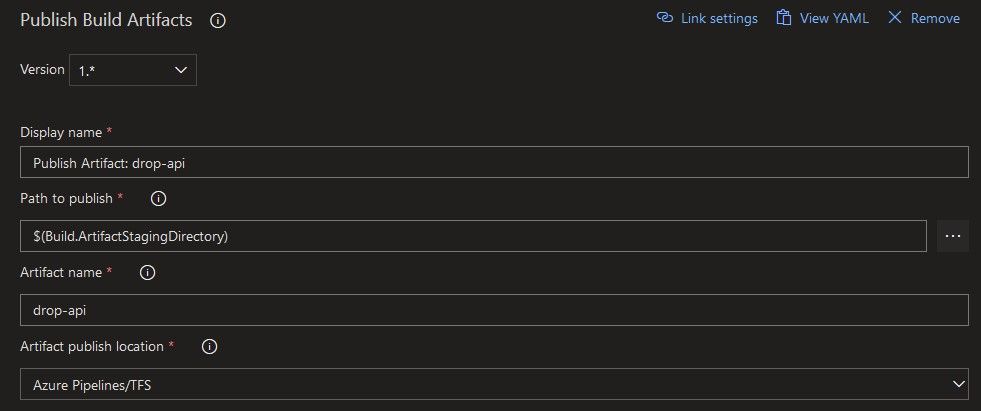
And at the end, to wrap everything up, I take the output of the dotnet publish command, and publish it as an artifact.
That's it for the API build.
SPFx Agent job
The SPFx build tasks require a bit more setup, but nothing complicated.
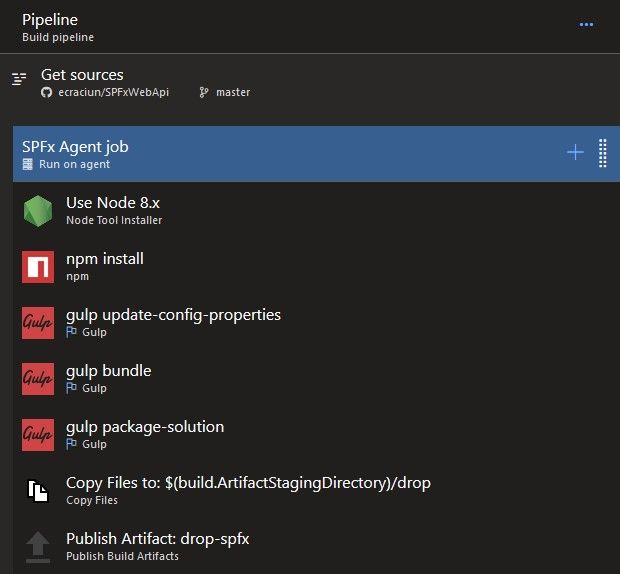
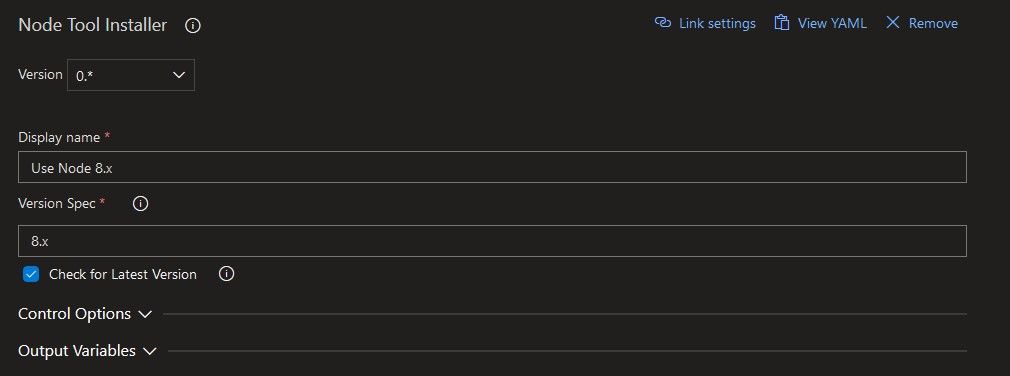
Firstly, we will need to install Node.js on the agent, and we have to request a specific major version, 8, for the SPFx app. This is a requirement, since it won't work with other Node versions. Make sure to check the "Check for Latest Version" box to have the most updated binaries.
After we have Node, we can go on and restore the solution's packages. I tweaked the settings to point to the folder that contains the package.json file.

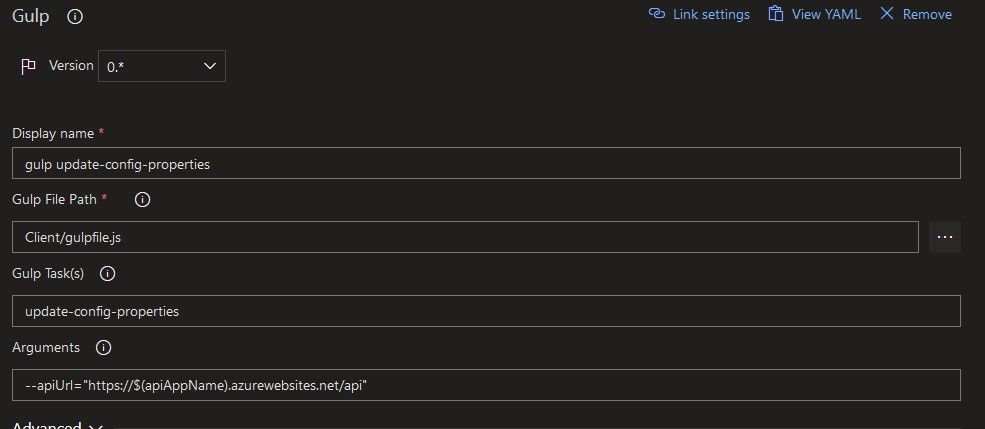
Now we have to update the app's configuration to point to the correct API URL. As mentioned in the solution description, this is a custom gulp task I created which re-writes the config file with the new URL retrieved form the pipeline variables. Also note that I had to point to the gulpfile.js file that contains the tasks.
gulp update-config-properties --apiUrl="https://$(apiAppName).azurewebsites.net/api"
After the setup is complete, we can go ahead and first bundle the solution, making sure we pass in the --ship argument.
gulp bundle --ship

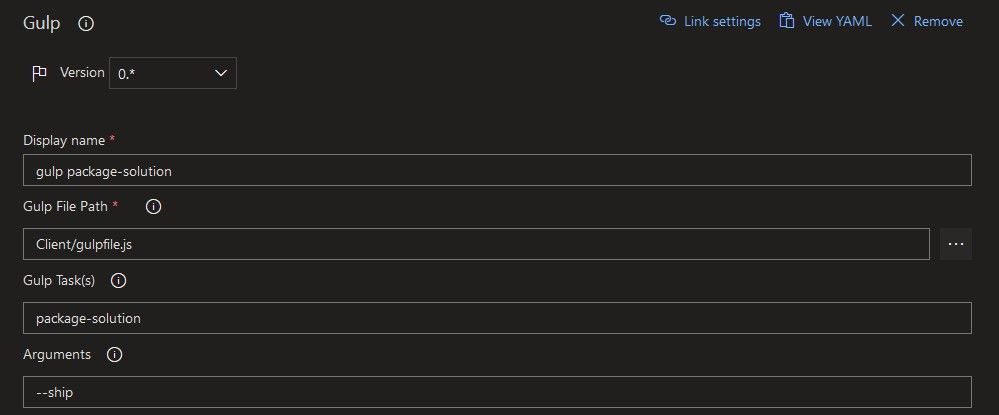
And as a last step, we create the package for the solution, also with the --ship argument.
gulp package-solution --ship
Now that everything is done, I just prepare the resulting .sppkg file to be published.
And sure enough, an artifact with a specific name is created from the solution package.
For more details about creating a CI pipeline for a SPFx app go here.
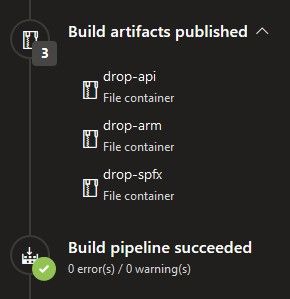
After some trials and errors, tweaks, and failure emails, I got all greens! Don't worry, if you followed my examples until now, you should get those lovely green check marks from the start.

And as I created 3 separate agent jobs, there are also 3 separate artifacts from this build pipeline.
That's about it for the build part, moving on to the deployment.
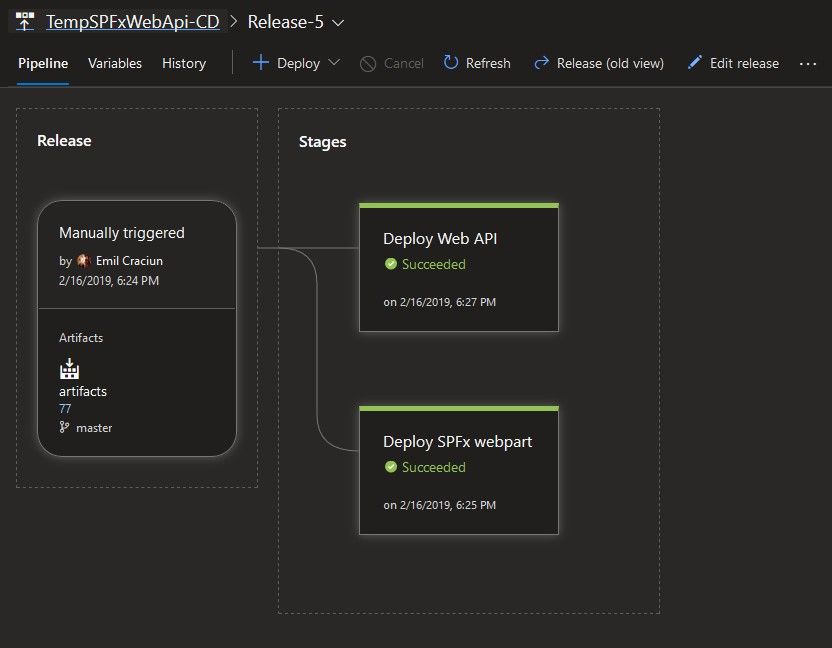
Then, we need a release pipeline
This is how my release pipeline looks like. It contains two separate stages, one for the backend and one for the client app. Both stages have the "After release" trigger selected, so they are not chained.
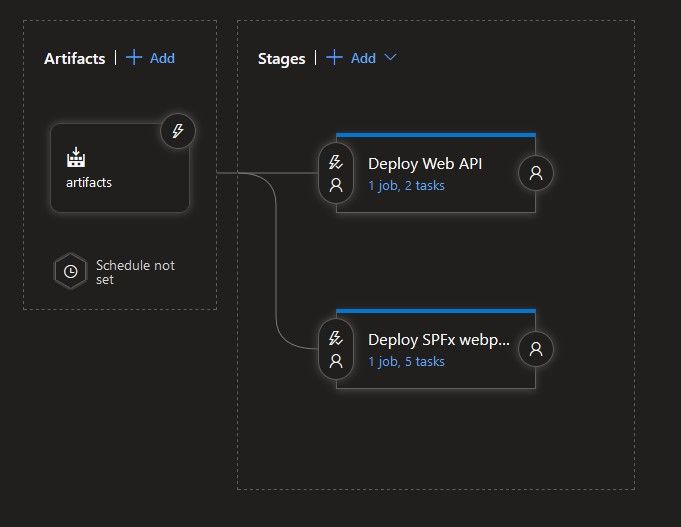
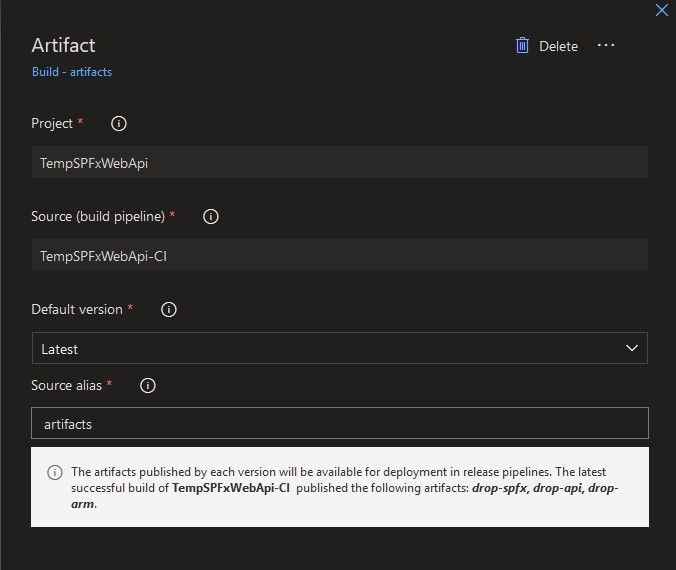
For the artifacts, I gave them a really inspired "artifacts" alias. This will be used later on.
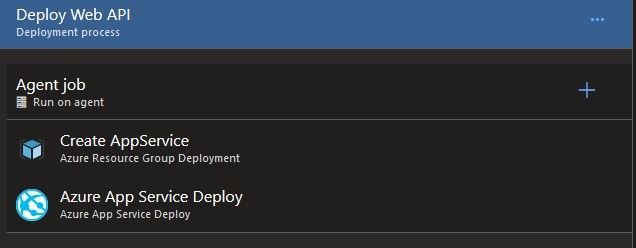
Deploying the Web API
This stage contains only two tasks, one for provisioning the infrastructure, and the other to deploy the actual app.
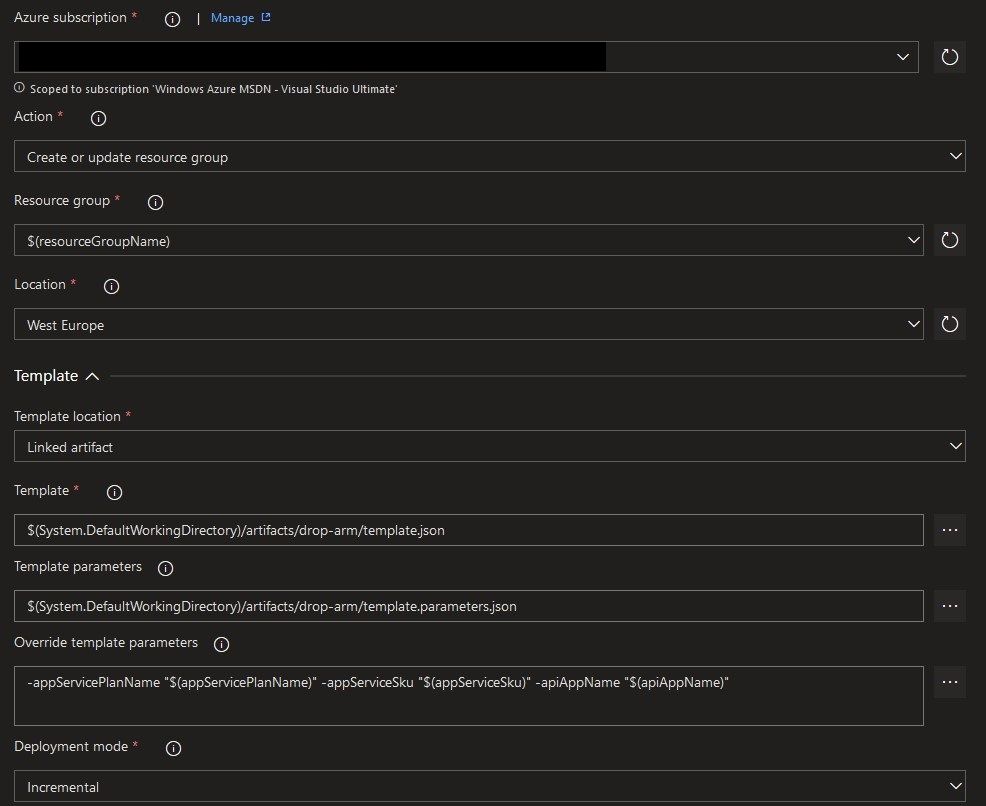
I configured the "Azure Resource Group Deployment" task with my Azure Subscription, and for the action I chose "Create or update resource group", because that's what we want to do here. The RG name comes from yet another variable. The template with its template parameter file are retrieved from the build pipeline's "drop-arm" artifact. I then went on to overwrite the parameters with the values from the available variable group. Oh, and as a last remark, make sure to select Incremental as the deployment mode, so that only the changes between deployments are actually applied.
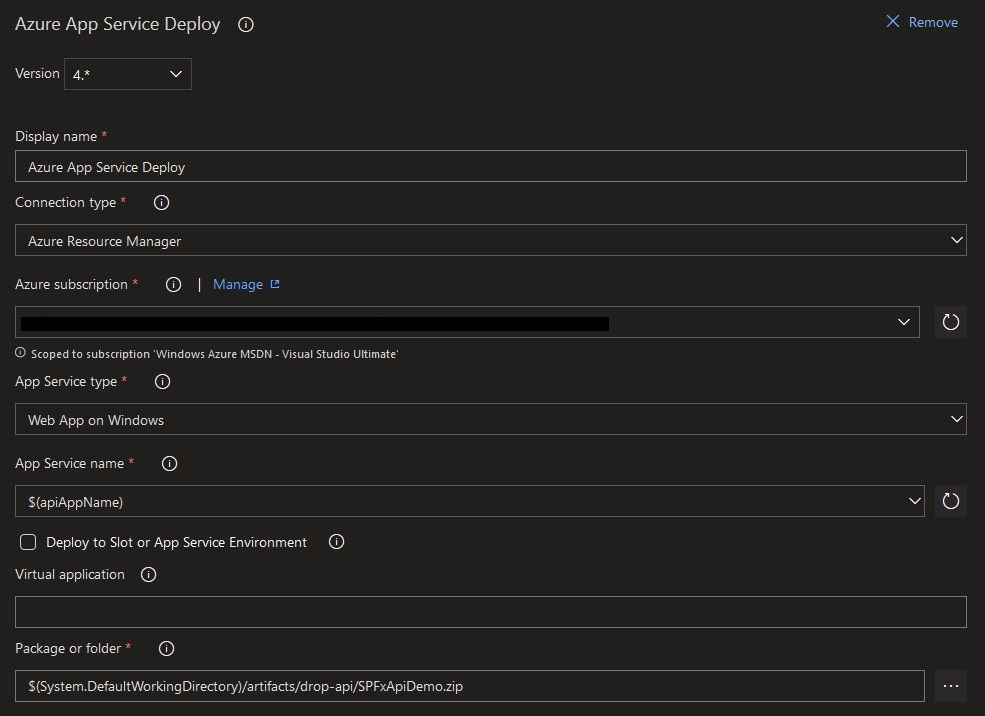
So we have everything set up for our custom API to run, we just have to push the package to the newly created AppService. For the connection type I went with ARM, and for the AppService type with "Web App on Windows" to keep things simple. The name of the service is configured in the linked variables. Lastly I point the task to where my package is and that's it.
Deploying the SPFx app
We will need a bit of setup again for the SPFx part. Node is required to get the Office365 CLI, and the task is configured the same as for the build, so I won't detail it again.
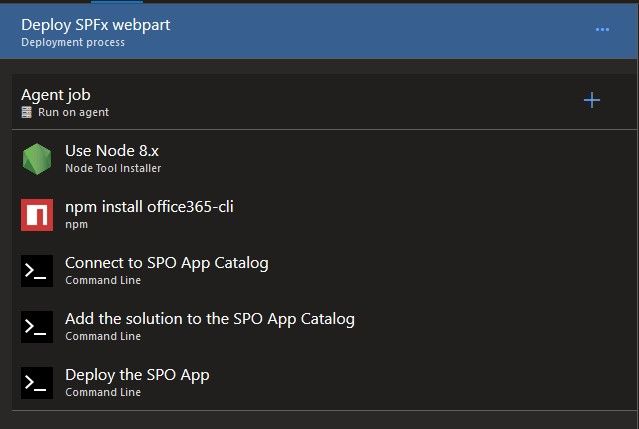
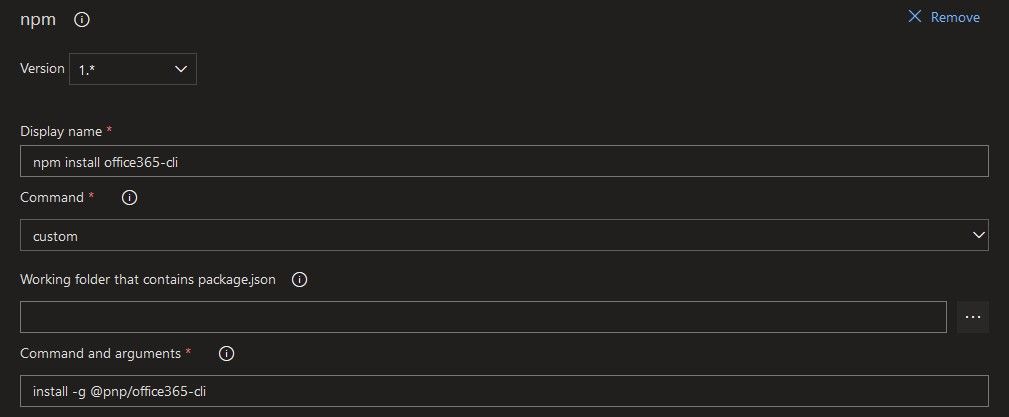
After we have Node installed, we pull the o365 cli package using NPM and set it up as a global dependency in order to use it in the following steps. This package is an open source project created by the OfficeDev PnP Community and it really comes in handy for many tasks.
npm install -g @pnp/office365-cli
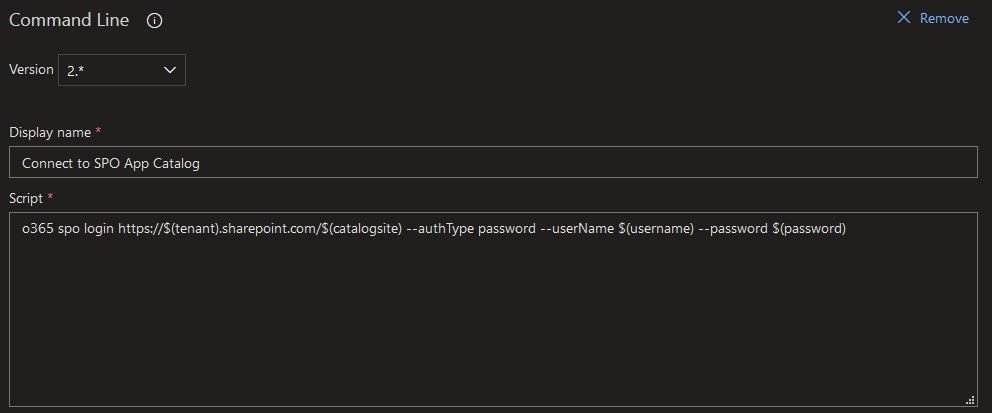
Now that we have our handy tool in place, we first need to connect and authenticate against the app catalog. We will use a simple Command Line task, which will be the base of the following tasks also. The command will be the following:
o365 spo login https://$(tenant).sharepoint.com/$(catalogsite) --authType password --userName $(username) --password $(password)
As a really important remark: make sure you first use this command on your tenant in interactive mode with that account. The CLI needs to be granted access to the tenant on the account's behalf. You can read more about this here. If you don't do this beforehand, your task will fail, as it did in my case because I skipped this important note, resulting in my release's demise.
As a small side-note: you can register for an Office 365 developer account for free for the first year. More details here. Since I wasn't a admin on my company's dev tenant, I ended up enrolling in the program and getting my very own kingdom. Fortunately it was quite quick, it took me under 10 minutes to get everything in place.
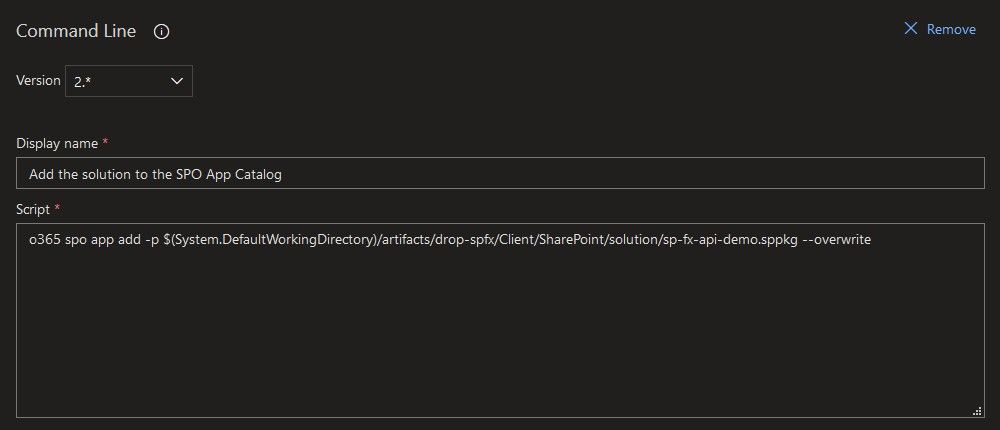
Once authenticated we can go ahead and add the solution to the app catalog using the following command:
o365 spo app add -p $(System.DefaultWorkingDirectory)/artifacts/drop-spfx/Client/SharePoint/solution/sp-fx-api-demo.sppkg --overwrite
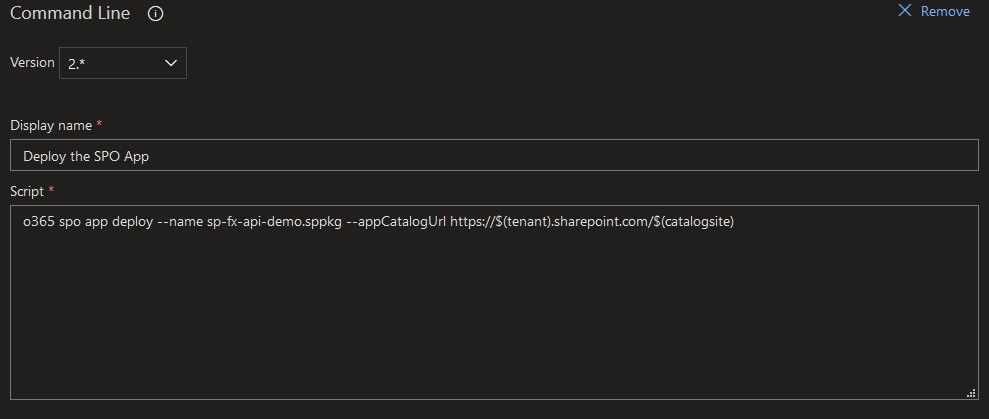
And then deploy the solution to make it available to all site collections using:
o365 spo app deploy --name sp-fx-api-demo.sppkg --appCatalogUrl https://$(tenant).sharepoint.com/$(catalogsite)
And we're done! That's it!
Just so you have the whole picture, here is the Variable Group created for this project, which is linked to both my build and release pipelines. Of course the naming could be improved, but for this quick example it is quite clear I'd say.
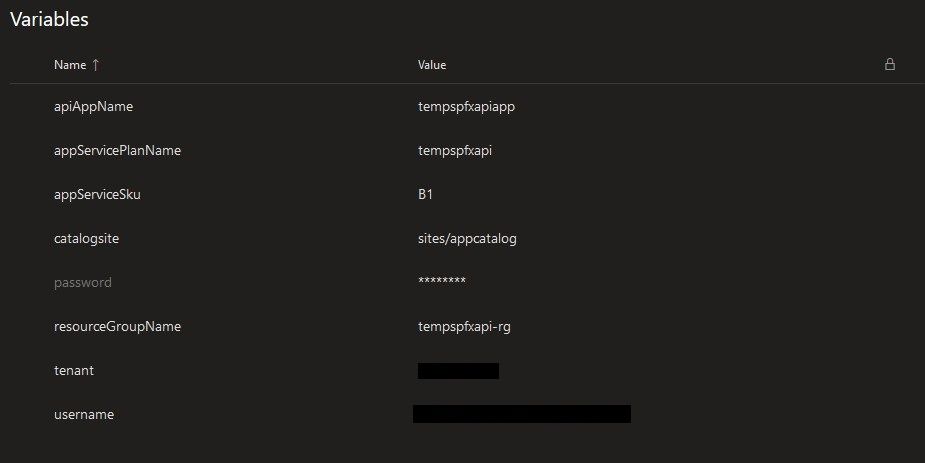
For more details about creating a CD pipeline for a SPFx app go here.
In the end, again after some tweaks and fixes I managed to get that beautiful green across the board :D.
My Azure Resource Group has been populated with the correct ... resources. You can see both the AppService Plan and the AppService have been successfully provisioned.

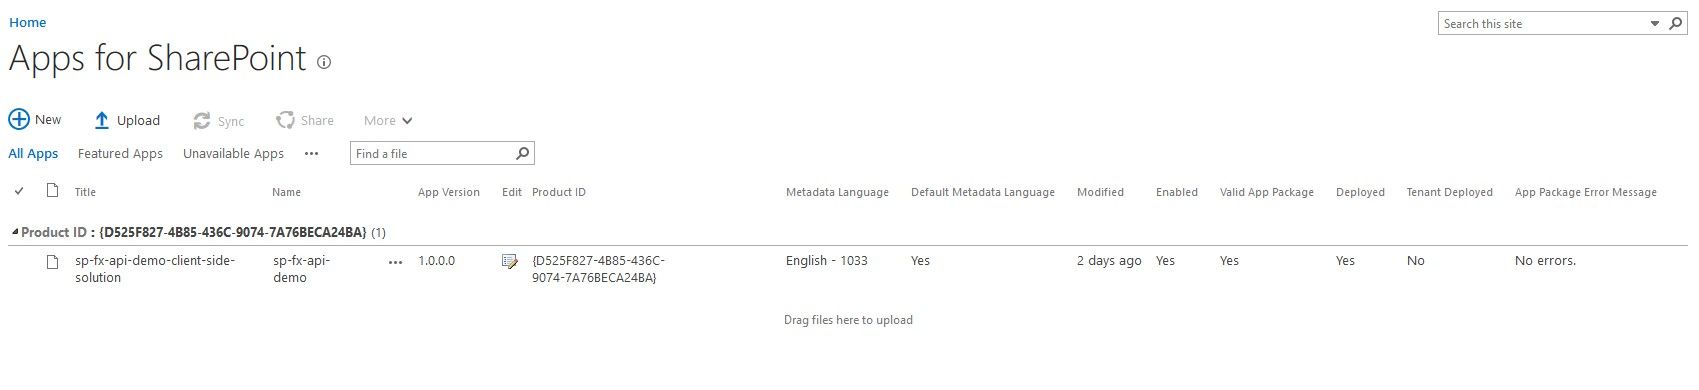
And if we take a look in my SPO app catalog, we can see that the package was successfully added and deployed.
Deploying the SPFx app in the old way
Originally, for the actual project, we had a different setup in place for the SPFx app.
To start with, in the client solution we created a new package.deploy.json file with some dependencies to the following npm packages, among a few others: gulp-spsync-creds and node-sppkg-deploy. These were to be used in the custom gulp tasks created for the deployment part.
Continuing, as a build step before publishing the SPFx package artifact, there was a Gulp task call that copied over the resulted solution package, the above mentioned package.json (renamed in the destination folder) and the gulpfile.js file. All these 3 pieces of the puzzle will be needed for the deployment part, which I'll describe below.
On the release pipeline side, the first step extracted the artifact archive, and then moved everything in place in the agent's default working directory. Then the combination on installing Node and restoring the packages (from the second, smaller package.json file) sets the already familiar tone. In the end a couple of Gulp tasks called the necessary methods in the gulpfile.js, one for uploading the package using gulp-spsync-creds, and one for deploying the fresh upload using node-sppkg-deploy. You can take a look at the code below:
build.task('upload-app-pkg', {
  execute: (config) => {
    environmentInfo.username = config.args['username'] || environmentInfo.username;
    environmentInfo.password = config.args['password'] || environmentInfo.password;
    environmentInfo.tenant = config.args['tenant'] || environmentInfo.tenant;
    environmentInfo.catalogSite = config.args['catalogsite'] || environmentInfo.catalogSite;

    return new Promise((resolve, reject) => {
      const pkgFile = require('./config/package-solution.json');
      const folderLocation = `./sharepoint/${pkgFile.paths.zippedPackage}`;

      return gulp.src(folderLocation)
        .pipe(spsync({
          "username": environmentInfo.username,
          "password": environmentInfo.password,
          "site": `https://${environmentInfo.tenant}.sharepoint.com/${environmentInfo.catalogSite}`,
          "libraryPath": "AppCatalog",
          "publish": true
        }))
        .on('finish', resolve);
    });
  }
});

build.task('deploy-sppkg', {
  execute: (config) => {
    environmentInfo.username = config.args['username'] || environmentInfo.username;
    environmentInfo.password = config.args['password'] || environmentInfo.password;
    environmentInfo.tenant = config.args['tenant'] || environmentInfo.tenant;
    environmentInfo.catalogSite = config.args['catalogsite'] || environmentInfo.catalogSite;

    const pkgFile = require('./config/package-solution.json');
    if (pkgFile) {
      // Retrieve the filename from the package solution config file
      let filename = pkgFile.paths.zippedPackage;
      // Remove the solution path from the filename
      filename = filename.split('/').pop();
      // Retrieve the skip feature deployment setting from the package solution config file
      const skipFeatureDeployment = pkgFile.solution.skipFeatureDeployment ? pkgFile.solution.skipFeatureDeployment : false;
      // Deploy the SharePoint package
      return sppkgDeploy.deploy({
        username: environmentInfo.username,
        password: environmentInfo.password,
        tenant: environmentInfo.tenant,
        site: environmentInfo.catalogSite,
        filename: filename,
        skipFeatureDeployment: skipFeatureDeployment,
        verbose: true
      });
    }
  }
});
These were the differences between our initial solution, and the current, more elegant one.
If we sit down and have both methods in front of us, we can see that the older one implied:
- deployment code to be included in the source of the app (well it wasn't included in the final package of course)
- introduction of two dependencies on some relatively unpopular (by the number of downloads) and not really updated packages (As you can see from the version history: https://www.npmjs.com/package/node-sppkg-deploy?activeTab=versions and https://www.npmjs.com/package/gulp-spsync-creds?activeTab=versions)
- adding extra steps and files to prepare everything for deployment
- basically more maintanance overhead
Now can you see why I've started this article in the first place? The method initially used wasn't that streamlined compared to what we have in place now and I didn't want others to face the setbacks I did. But thankfully new documentation has surfaced, with better practices, helping us improve our processes.
Summing it all up
Given the current nature of rapid software development it would be naive and detrimental to rely on manual, error prone processes that are part of the application's lifecycle. I've been completely and instantly awe-struck when I first saw DevOps practices in real life. I had the opportunity to observe first hand how you can completely wipe out a complex Azure solution spanning across multiple resources and services with one click, and to re-create everything from scratch also with one click, at my last job. Since then, I have used pipelines even for personal projects and been their outspoken advocate (as much as I could) on every suitable project I work on, no matter how small or simple it is. Because seriously, who wouldn't love to get the burden of building, testing and releasing off their shoulders?
In this article I wrote about how relatively easy it is to set up CI & CD for a solution comprised of a SharePoint Framework webpart app and a ASP.NET Core Web API. I've also pointed out the areas that need extra attention and in the last part I've went through how we implemented everything before I've discovered how to use the o365 cli.
I hope you enjoyed reading this article at least as much as I have enjoyed writing it. If you have any thoughts or suggestions, please drop them in the comment section below.
Happy coding!